The complications of operating in a hybrid environment, with some things (user mailboxes) in the Cloud and other things (distribution groups) in on-prem Exchange, make our tasks more difficult. Managing membership of distribution groups is one of those things unfortunately.
Before beginning, you need the following:
- A UF, active-directory joined, Windows computer connected to the UF network (this means you login to your computer with your GatorLink username/password and are connected to the VPN if working remotely)
- The group’s name (not display name) or email address
Your Outlook email client now connects to the cloud. However, distribution groups still reside in on-campus Exchange and Active Directory. Because of this you need a tool that connects to the on-prem directory.
Windows 10
In Windows 10, open File Explorer either by clicking the File Explorer icon on the taskbar or by finding it within the Windows menu.

Once you have opened File Explorer, find and select the Network location (1) on the left-hand navigation pane. When clicked, the ribbon will update and you may get a pop-up error message about network discovery (2). If you do get the pop-up error simply click the Ok button to close it… you do not need network discovery turned on to do this.
To find the distribution group you want to modify, click the Search Active Directory (3) option in the ribbon. Continue with the “Find Your Group” section below.
Windows 11
Method 1: Active Directory Users and Computers
Many IT groups have started installing a tool called Active Directory Users and Computers that is used to manage active directory objects like the groups used for creating distribution groups. You can find this installed within your Windows menu.
Once you have Active Directory Users and Computers running, right-click “ad.ufl.edu” in the left pane and select “Find” from the resulting context menu.
Alternatively, you can browse through active directory, typically with a “Groups” organizational unit (OU), which looks like a folder icon, within your departments OU under ad.ufl.edu\UF\Departments\PROVOST\COLLEGE-ENGINEERING.
Continue with the “Find Your Group” section below.
Method 2: Manual Directory Search
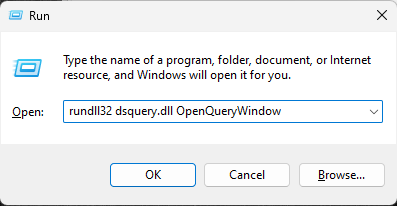
If you do not have Active Directory Users and Computers installed, you can still use a little known trick for searching active directory. In the Run dialog (hit Windows+R to bring it up), type:
rundll32 dsquery.dll OpenQueryWindow
and click the OK button. This command is case sensitive.
Continue with the “Find Your Group” section below.
Find Your Group
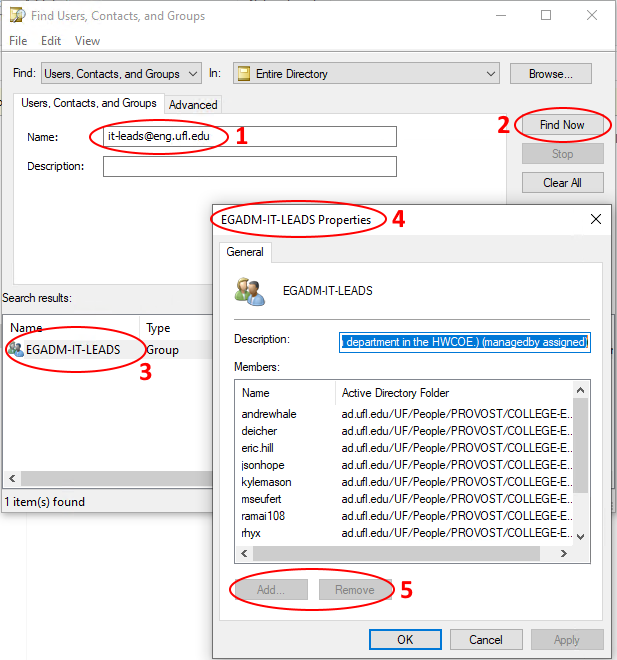
You will be presented with a Find Users, Contacts, and Groups dialog box (example below) where you will type in the distribution group’s name or email address (1) and click the Find Now button (2). In the Search Results pane, double-click on the group you searched (3) for to open its properties (4).
If you’ve been delegated management capabilities of the group the Add… and Remove buttons (5) will be available to you (in this example they are greyed out and unavailable).
- To Remove A Member: click the GatorLink name of the user you want to remove so that it is highlighted and click the Remove button
- To Add A Member: click the Add… button. A new dialog will appear allowing you to find the user (enter the GatorLink name)
After adding/removing the desired members, click the Ok button to save changes and close out of any other dialogs or windows.